

How Do You Draw 3d Characters On Rocks?
How to model realistic-looking 3D rocks and stones

The need to create realistic and conceivable natural elements for scenes is becoming more and more mutual. Rocks and stones might seem similar the easiest aspects of a natural scene to reproduce but in reality they are as as complex as plants and trees, just in a different way.
There are plug-ins available that will produce a one-half-decent looking stone at the click of a mouse. Yet it really isn't too difficult to create one for yourself, peculiarly with the powerful racket tools found in some sculpting applications.
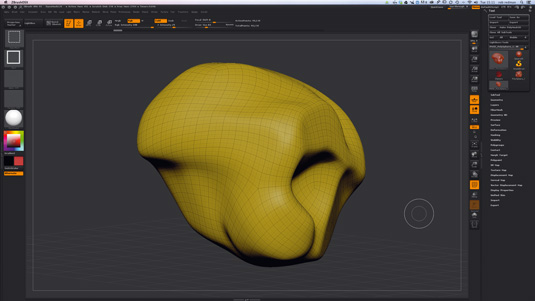
For this example we will use ZBrush for the whole process but you could use whatever modelling app to build your initial mesh, so if you want to add fine surface details such equally cement or brick, so you can use the same tips to practice so.
- Yous can discover more useful ZBrush tutorials here
Key to success
The key to success hither is to understand how the Noise Curve works in ZBrush. This surface/racket tool allows you to create practically limitless types of surface detail – from skin pores to lava flows – and they key is in the relationship between the curve itself and the scale.
The best way I can describe the curve is to compare information technology to the curves in Photoshop merely the points forth the curve chronicle not to a tone, but to height. This ways that if you click on the bend you can drag the newly formed point up or down and that will conduct over to the surface, where the corresponding area of the noise will raise up from the surface, or cut down into information technology.
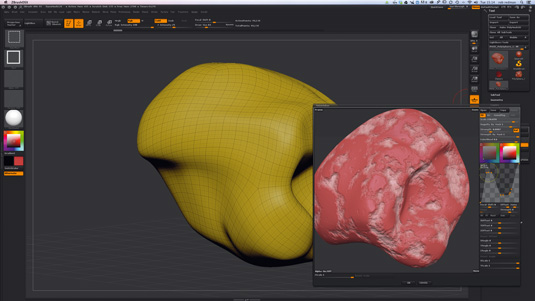
Then, after a little experimentation you should be able to become small scale, regular racket, which can be slap-up for peel pores; and crude noise, which is perfect for rocks. Using the curve you tin also add 'divots' into the dissonance, so y'all have a shine surface dotted with random pockmarks or craters.
The power of this tool is obvious subsequently only a few minutes of playing with the noises themselves just yous can take information technology further using masks. You lot tin can paint a mask onto your mesh and then have racket applied simply to the masked areas. I similar to create layers for each masked area and so that I can add noises to specific parts of my geometry but retain the ability to adjust each noise type as necessary, at any point in the process.
This means that if for some reason a face has too much stubble, I don't need to smooth it out. I tin simply reduce the force of the stubble layer, without destroying the noise information. Quite oftentimes a model volition go through multiple revisions, then this is a massive timesaver.
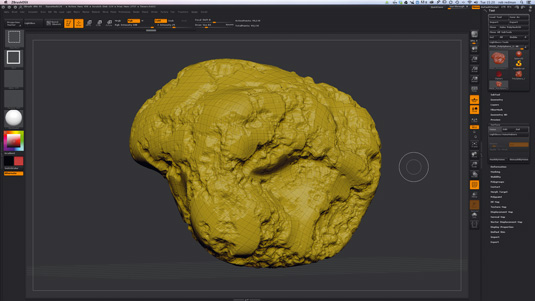
Back to working with stones and rocks. The commencement thing you need to decide is the blazon of rock you want to create, equally this will accept an firsthand impact on the noise needed for the scene. Your best bet hither is to do a little research and spend some fourth dimension with Google images, checking out examples. 1 pace better than that is to grab a physical sample, which will then allow you lot to measure the calibration of the details compared to the object. If possible, this is worth doing for total accurateness.
Once you lot get used to the mechanics of creating the dissonance it'southward quite a elementary process: the three-stride section to the correct details information technology. Once done you can either bake it into your usual ZBrush displacement or normal maps or you could use decimation main to reduce your geometry and export a .OBJ, which is what I did for the model in the main render.
Words: Rob Redman
Rob Redman is 3D Earth'south technical editor and a 3D artist and trainer. This article originally appeared in 3D World issue 175.
Related articles

Source: https://www.creativebloq.com/3d/how-model-realistic-looking-3d-rocks-and-stones-31411017
Posted by: randlejehing.blogspot.com
0 Response to "How Do You Draw 3d Characters On Rocks?"
Post a Comment